
-
Module 6: Time Management
Timemanagement geeft je regie, rust en energie. Klik op de slide om naar de volgende gaan, klik links aan de zijkant van de slide om een slide te kiezen. Download hier je checklist: Bijlage 1 – Checklist Timemanagement In de volgende module gaan we kijken naar kennisbeheer, de motor van een volwassen Servicedesk < Module…
-
Module 5: AI als partner
AI is een partner, geen vervanger. Samen zijn jullie sterker. Klik op de slide om naar de volgende gaan, klik links aan de zijkant van de slide om een slide te kiezen. Download hier je checklist: Bijlage 1 – Checklist AI als partner In de volgende module gaan we kijken naar time management en rust…
-
Module 4: NEE is ook Service
“Nee” is geen afwijzing, het is eerlijkheid. En eerlijkheid bouwt vertrouwen. Klik op de slide om naar de volgende gaan, klik links aan de zijkant van de slide om een slide te kiezen. Download hier je checklist: Bijlage 1 – Checklist NEE is ook Service In de volgende module gaan we kijken hoe je AI…
-

Module 3: Professioneel documenteren
Documenteren is geen administratie, het is samenwerken. Hoe beter jij documenteert, hoe makkelijker het werk wordt voor jou, je collega’s en de klant. Klik op de slide om naar de volgende gaan, klik links aan de zijkant van de slide om een slide te kiezen. Download hier je checklist: Bijlage 1 – Checklist Professioneel documenteren…
-
Module 2: Actief luisteren & Empathie
Actief luisteren en empathie maken je werk niet alleen makkelijker, maar ook menselijker. Ze brengen rust, vertrouwen en duidelijkheid. Klik op de slide om naar de volgende gaan, klik links aan de zijkant van de slide om een slide te kiezen. Download hier je checklist: Bijlage 1 – Checklist Actief Luisteren & Empathie In de…
-
Module 1: LSDD Fundamentals
LSDD is klein in tijd, maar groot in impact. Het maakt je gesprekken rustiger, je tickets duidelijker en je werk makkelijker. Klik op de slide om naar de volgende gaan, klik links aan de zijkant van de slide om een slide te kiezen. Download hier je checklist: Bijlage 1 – Checklist LSDD Fundamentals In de…
-

Van AI tot Z
Voorwoord Dit artikel is geboren uit nieuwsgierigheid. Nieuwsgierigheid naar wat kunstmatige intelligentie werkelijk betekent, niet alleen voor technici maar voor iedereen. Want AI is geen abstract begrip dat zich afspeelt in laboratoria of achter gesloten deuren. Het is een kracht die steeds vaker ons dagelijks leven raakt: in hoe we werken, leren, zorgen, reizen en…
-

Lifecyclegedreven IT
IT-apparatuur van Aanschaf tot Afvoer Download het volledige document als PDF: Lifecyclegedreven IT.pdf Versie: 1.0Datum publicatie: 6 juli 2025 Introductie: In deze uitgebreide gids nemen we je mee door de volledige levenscyclus van IT-apparatuur – van de eerste aanschaf beslissing tot de veilige en verantwoorde afvoer. Lifecyclebeheer is geen technische bijzaak, maar een strategisch fundament voor…
-

Apple Intelligence op iPhone en iPad
AI binnen het Apple-ecosysteem Download het volledige document als PDF: Apple Intelligence op iPhone en iPad.pdf Versie: 1.0Datum publicatie: 21 juni 2025 Deze gids laat zien hoe je iPhone en iPad met Apple Intelligence veranderen in slimme assistenten die je dagelijks vooruithelpen — van herschrijven in Berichten en Mail tot sneller zoeken in Notities, Agenda…
-

Apple Intelligence op de Mac
Slimmer werken, gewoon thuis of op kantoor Download het volledige document als PDF: Apple Intelligence op de Mac.pdf Versie: 1.0Datum publicatie: 19 juni 2025 In deze gids ontdek je hoe je Apple Intelligence gebruikt op je Mac – zonder moeilijke instellingen, maar met directe impact. Of je nu je mailbox sneller wilt afhandelen, documenten duidelijker schrijft, of eindelijk moeiteloos dat ene…
-
Apple Intelligence uitgelegd
AI binnen het Apple-ecosysteem Download het volledige document als PDF: Apple Intelligence uitgelegd – AI binnen het Apple-ecosysteem.pdf Versie: 1.0Datum publicatie: 15 juni 2025 Apple Intelligence voor de Servicedesk Deze uitgebreide handleiding helpt servicedeskmedewerkers om Apple Intelligence optimaal te begrijpen en uit te leggen aan eindgebruikers. In duidelijke hoofdstukken leer je wat Apple Intelligence is, hoe…
-

AI ALS PARTNER
Ondersteuning met voor de Servicedesk Download het volledige document als PDF: AI ALS PARTNER – De Servicedesk op weg naar Efficiëntie.pdf Versie: 1.0Datum publicatie: 14 juni 2025 Deze handleiding biedt een uitgebreide en praktische gids voor Servicedeskmedewerkers die willen leren hoe kunstmatige intelligentie (AI) hun werk kan ondersteunen en efficiënter maken. Met tools zoals Microsoft…
-

Microsoft Authenticator & MFA
Ondersteuning met voor de Servicedesk Download het volledige document als PDF: Microsoft Authenticator & MFA – Ondersteuning voor de Servicedesk.pdf Versie: 1.0Datum publicatie: 11 juni 2025 Microsoft Authenticator & MFA (Meervoudige verificatie) zijn de sleutel tot moderne, veilige toegang tot Microsoft 365. Met MFA loggen gebruikers niet alleen in met een wachtwoord, maar bevestigen ze…
-

Microsoft Graph
Download het volledige document als PDF: Microsoft Graph.pdf Versie: 1.0Datum publicatie: 10 juni 2025 Microsoft Graph is de onzichtbare verbindingslaag die alle Microsoft 365-apps met elkaar laat samenwerken. Het zorgt ervoor dat applicaties zoals Outlook, Teams, OneDrive, SharePoint en Planner gegevens kunnen delen en interpreteren binnen de context van de gebruiker. Wat doet Microsoft Graph?…
-

Microsoft Copilot
Ondersteuning met AI voor de Servicedesk Download het volledige document als PDF: Microsoft Copilot – Ondersteuning met AI voor de Servicedesk.pdf Versie: 1.0Datum publicatie: 10 juni 2025 Microsoft Copilot – Ondersteuning met AI voor de Servicedesk is een praktische handleiding voor servicedeskmedewerkers over het gebruik van Microsoft Copilot binnen Microsoft 365. Het document legt helder…
-
To Do & Planner
Voor de Servicedesk Download het volledige document als PDF: To Do & Planner – Voor de Servicedesk.pdf Versie: 1.0Datum publicatie: 10 juni 2025 “To Do & Planner – Voor de Servicedesk” is een praktische handleiding voor Servicedeskmedewerkers die gebruikers ondersteunen bij het werken met Microsoft To Do en Planner – de twee taakbeheertools binnen Microsoft…
-

Outlook (Online)
Servicedesk Handleiding Download het volledige document als PDF: Outlook (Online) – Servicedesk Handleiding.pdf Versie: 1.0Datum publicatie: 10 juni 2025 “Outlook (Online) – Servicedesk Handleiding” is een uitgebreide gids voor Servicedeskmedewerkers om gebruikers effectief te ondersteunen bij het gebruik van Outlook – zowel de desktopapplicatie als de online versie. De handleiding behandelt veelvoorkomende vragen over e-mail,…
-
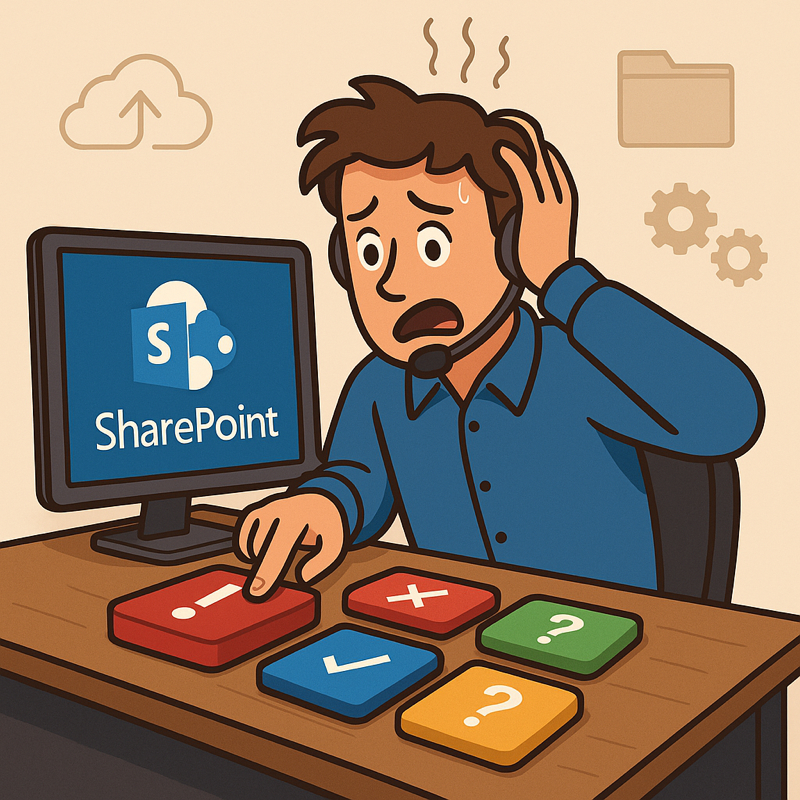
Weetjes voor Microsoft SharePoint
Download het volledige document als PDF: Weetjes voor SharePoint.pdf Versie: 1.0Datum publicatie: 10 juni 2025 “Weetjes voor SharePoint” is een praktisch overzicht met slimme tips voor gebruikers die werken met SharePoint binnen Microsoft 365. Het document legt uit dat elk Teams-kanaal automatisch gekoppeld is aan een SharePoint-map en dat bestanden dus in SharePoint worden opgeslagen.…
-

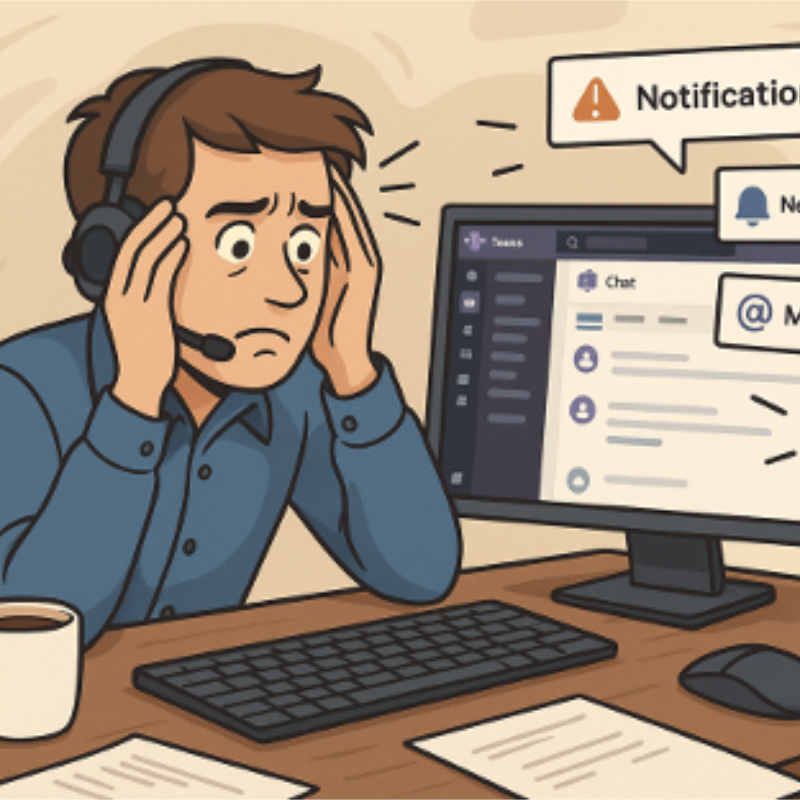
Weetjes voor Microsoft Teams
Download het volledige document als PDF: Weetjes voor Microsoft Teams.pdf Versie: 1.0Datum publicatie: 10 juni 2025 In het document “Weetjes voor Microsoft Teams” staan praktische tips en verborgen functies die het dagelijks gebruik van Teams makkelijker en efficiënter maken. Denk aan sneltoetsen zoals Ctrl + Shift + M voor mute/unmute tijdens vergaderingen, het beheren van…
-
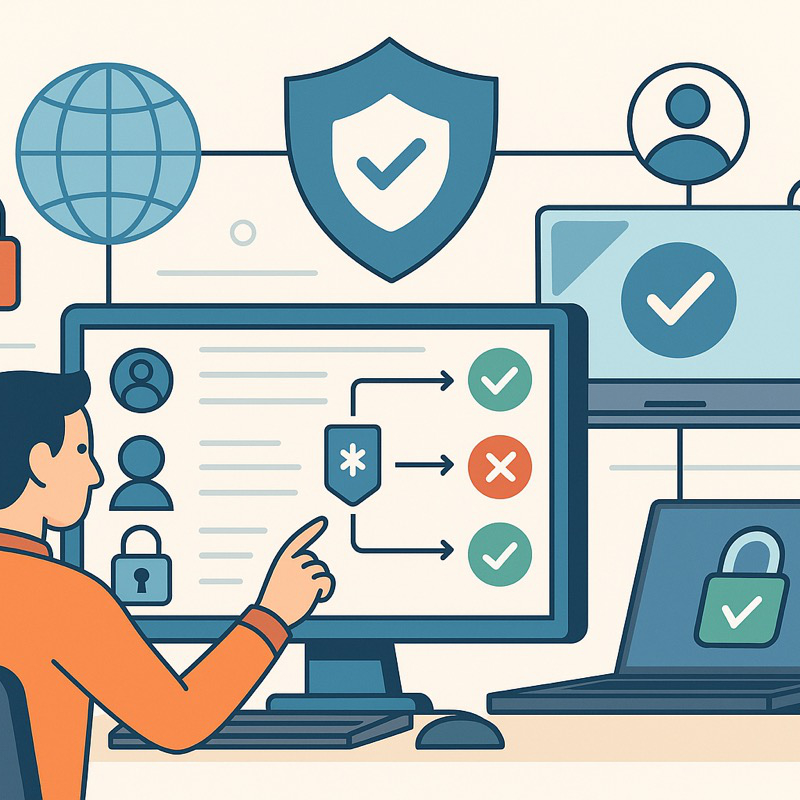
Conditional Access uitgelegd
Voor de Servicedesk (de basis) Download het volledige document als PDF: Conditional Access uitgelegd – Voor de Servicedesk (de basis).pdf Versie: 1.0Datum publicatie: 10 juni 2025 Conditional Access uitgelegd – Voor de Servicedesk (de basis) is een heldere en praktische handleiding voor Servicedeskmedewerkers die te maken krijgen met gebruikersvragen over toegangsproblemen, MFA-verzoeken en foutmeldingen in…
-
Teams uitgelegd
Voor de Servicedesk zonder knoppenstress Download het volledige document als PDF: Teams uitgelegd – Voor de Servicedesk zonder knoppenstress.pdf Versie: 1.0Datum publicatie: 10 juni 2025 Teams uitgelegd – Voor de Servicedesk zonder knoppenstress is een praktische handleiding die Servicedeskmedewerkers ondersteunt bij het beantwoorden van gebruikersvragen over Microsoft Teams. De focus ligt op gebruikersondersteuning, niet op…
-
SharePoint uitgelegd
Voor de Servicedesk zonder knoppenstress Download het volledige document als PDF: SharePoint uitgelegd – Voor de Servicedesk zonder knoppenstress.pdf Versie: 1.1Datum publicatie: 10 juni 2025 SharePoint uitgelegd – Voor de Servicedesk zonder knoppenstress is een praktische handleiding voor Servicedeskmedewerkers die gebruikers ondersteunen bij het werken met Microsoft SharePoint. Hoewel deze medewerkers geen beheerdersrechten hebben, is…
-
Time for an upgrade: Apple Watch SE or Series 10?
Why should I choose for an Apple Watch SE or an Apple Watch 10? At the moment, I have an Apple Watch SE from 2020 (44mm size), and I’m considering replace it with either the new Apple Watch SE (2024) or the Apple Watch 10. First of all, I don’t do mountain biking anymore because…
-

Opera web browser
I can’t remember exactly when I started using the Opera web browser, but after all these years, I’m still using it. Before Opera, I used Firefox, but it was slow and crashed frequently. Google Chrome was faster, but it constantly kept the CPU busy and slowed down other programs—definitely the most annoying browser for me.…
-

How I became an Apple Fan
Most of my time, I’ve spent using Windows, like many others who grew up with it. Sometimes, people ask me how I became an Apple fan. How it a started I don’t remember the exact year, but back then, every cellphone maker had its own OS, and smartphones were becoming popular. At this moment I…
-

Apple (UWB) Ultra WideBand-technology
UWB stands for Ultra WideBand technology, controlled by the U-chip (U1 or U2 chip) in your iPhone. This chip continuously track your location so Apple can disable UWB in countries or regions where its use is prohibited, such as near military installations or radio telescopes. UWB is unavailable is the following countries: Armenia, Azerbaijan, Belarus,…
-

Follow Me on BlueSky! 🚀
In the past, I used Twitter, but then it changed to X… so I left! ❌ There were plenty of reasons for me to leave, and even more for others. But now I’m back, just like many others, on BlueSky! 🌥️✨ I’ll be posting daily (a least I try) about tech 🖥️, IT 🔧, and…
-

Apple OS versions Timeline
This page itsn’t ready jet… Image Name Version Year Not Available macOS Sequoia 15 2024 Not Available macOS Sonoma 14 2023 Not Available macOS Ventura 13 2022 Not Available macOS Monterey 12 2021 Not Available macOS Big Sure 11 2020 Not Available macOS Catalina 10.15 2019 Not Available macOS Mojave 10.14 2018 Not Available OS…
-
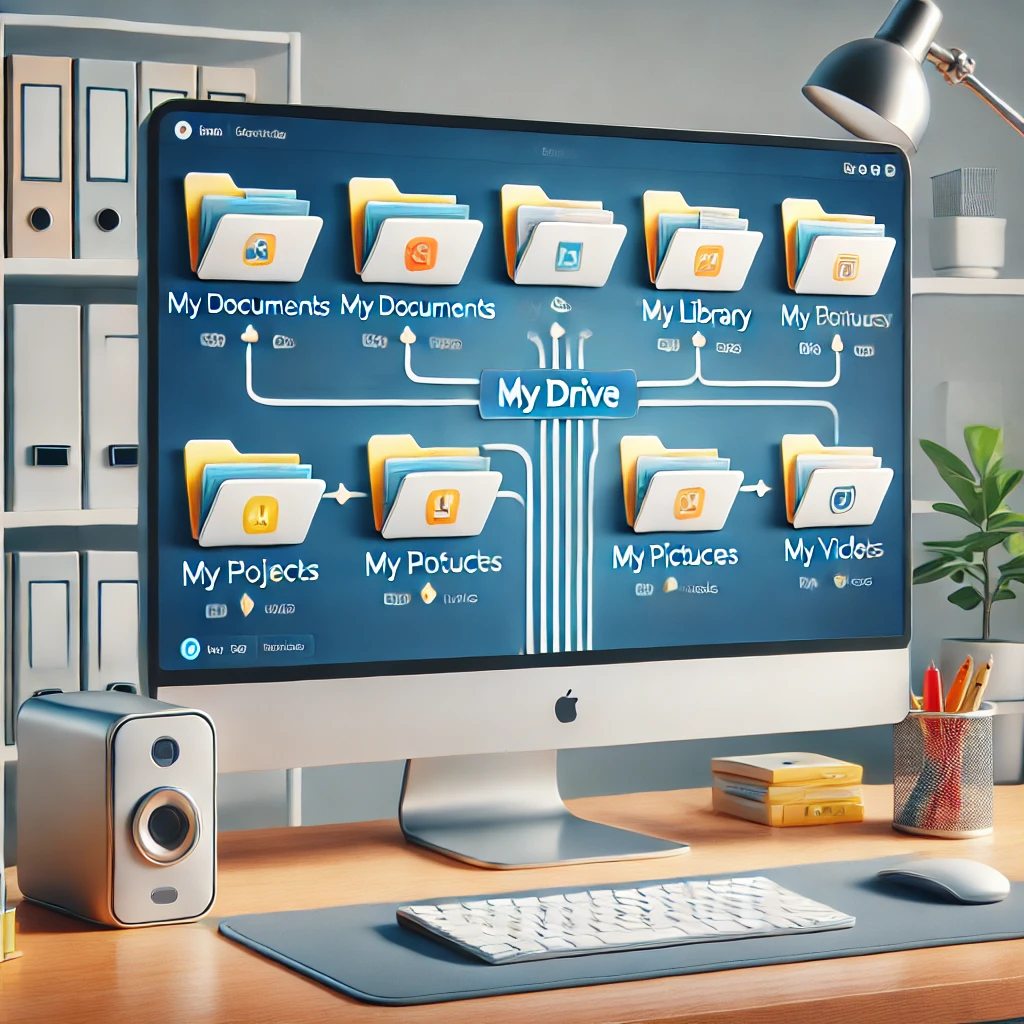
Directory structure
You probably know the feeling: your documents in the “Documents” folder are almost completely mixed up. I recognize this too. Every time I try to tidy up, I end up with folders labeled “to sort”, “miscellaneous” and “archive” filled with everything I don’t know where to put. But what is a good folder structure? I…
-
This power supply is not capable of supplying, Power to peripherals will be restricted
Raspberry Pi 5 8GB with NVMe hat + 128GB NVMe moduleOriginal Power Supply for RPi5 (EU) Issue:When the desktop loads, the following message appears: “This power supply is not capable of supplying sufficient power. Power to peripherals will be restricted.” Solution: 1. Open a terminal and navigate to the firmware directory: 2. Open the configuration…
-
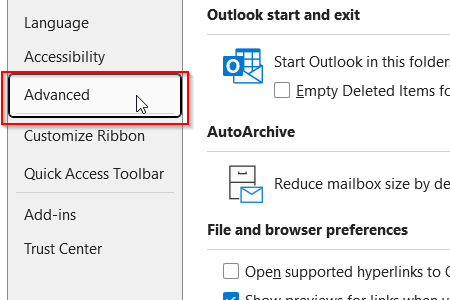
Open hyperlinks in Outlook in your default browser instead of Microsoft Edge
By default all hyperlinks will open in Microsoft Edge instead of your systems default browser.Follow the steps below to change this. Step 1Open Outlook and click on “File” at the top left. Step 2Choose “Options” at the bottom left of the window. Step 3A new window appears, choose for “Advanced”. Look for “File and browser…
-

Volt, Ampère, Ohm and Watt calculator in Python
This is a little Python script for learning, nothing serieus, but working.
-
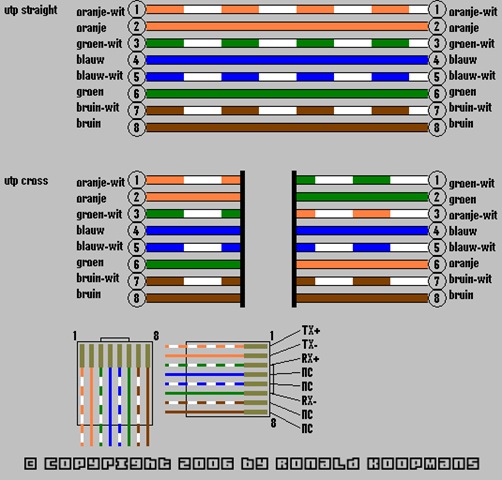
RJ-45 Connector Wiring Diagram
I drew this diagram in 2006, and it is still a useful tool today if you attach RJ-45 connectors to cables yourself. A little detail… it was fully made in MS Paint 😉
-
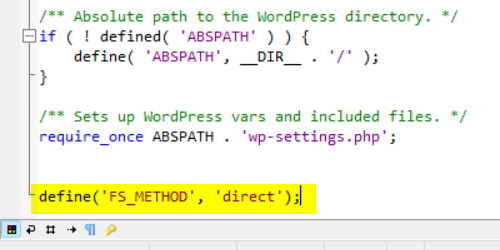
Fix: WordPress needs FTP credentials for updates and plugins
If your WordPress is asking for FTP credentials to update or install plugins or themes… Step 1Open the wp-config.php in notepad or even better in Programmers Notepad. Step 2Go down to the bottom of the file and create two new lines. Step 3Add the following text: Step 4Save the document and reload the page.
-
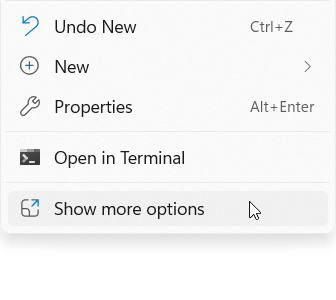
Disable “Show more options” on right click in Explorer in Windows 11
Step 1Press: [WIN] + [R]Typ: cmdPress: [ENTER] Step 2Typ: reg add HKCU\Software\Classes\CLSID\{86ca1aa0-34aa-4e8b-a509-50c905bae2a2}\InprocServer32 /ve /d “” /fPress: [ENTER] Step 3Typ: taskkill /f /im explorer.exePress: [ENTER] Step 4Typ: start explorer.exePress: [ENTER]Typ: exitPress: [ENTER] Update: To enable this option again: Change Step 2 in:Typ: reg add HKCU\Software\Classes\CLSID\{86ca1aa0-34aa-4e8b-a509-50c905bae2a2}\InprocServer32Press: [ENTER] Skip Step 3 and go to the “Exit” part of…
-
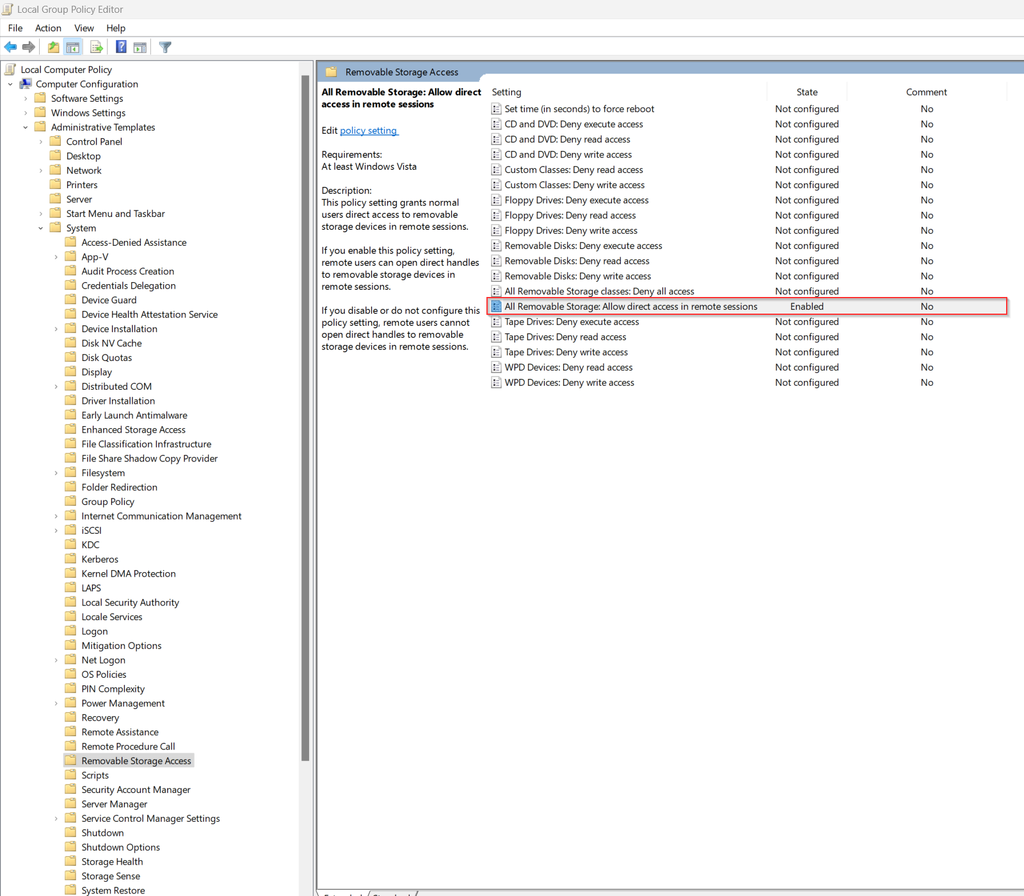
Make it possible to burn a CD or DVD when using remote desktop
Step 1 Press: [WIN] + [R]Typ: gpedit.mscPress: [ENTER] Step 2 Navigate to:Local Machine Policy– Computer Configuration— Administrative Templates— System—- Removable Storage Access Step 3 Double Click: All Removable Storage: Allow direct access in remote sessionsChoose: EnableClick: “Apply”Click: “OK” Step 4 (optional) Reboot computer or Press: [WIN] + [R]Typ: CMDPress: [ENTER] Typ: gpupdate /forcePress: [ENTER] Typ:…
-
Create a Windows 7 or (higher) USB installation media from a ISO
Step 1Place a USB Drive in the computer. (ofcourse in a USB-port ;-))Please notice: ALL DATA WILL BE DELETED Step 2Press: [WIN] + [R]Typ: CMDPress: [CTRL] + [SHIFT] + [ENTER] Step 3Typ: diskpartPress: [ENTER] Typ: list diskPress: [ENTER] Step 4Look for the USB Drive. In my case this is Disk 1 Typ: select diskTyp: cleanPress:…
-
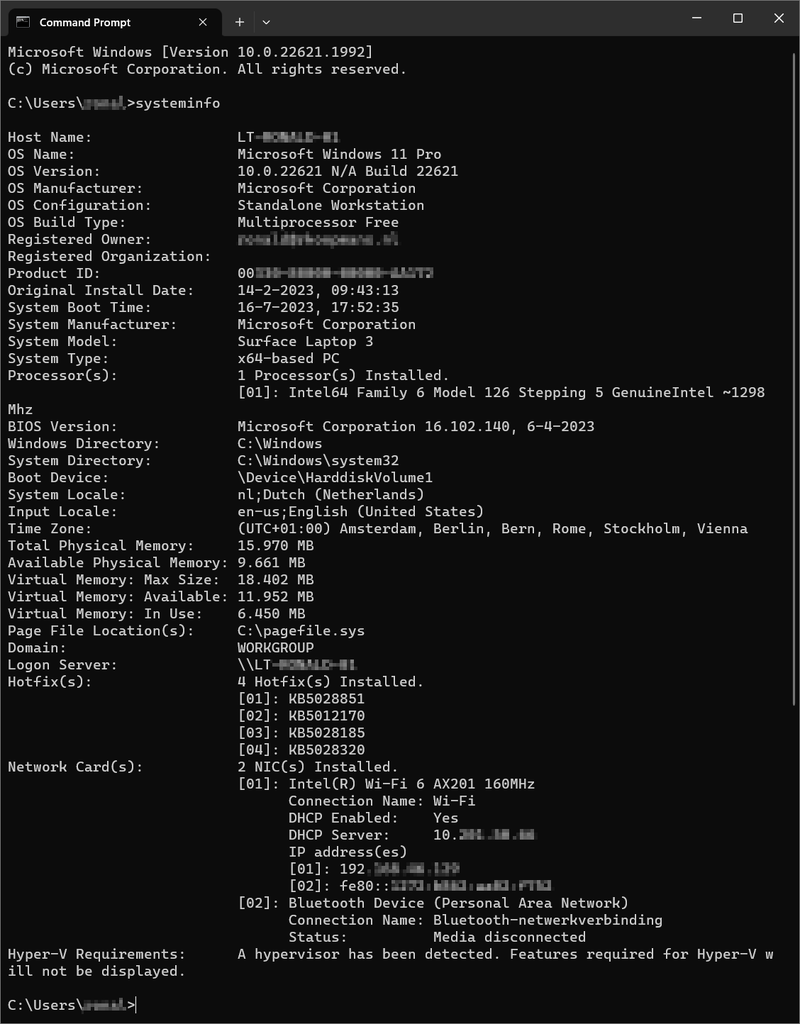
System Information with Command Prompt
Step 1Press: [WIN] + [R]Typ: CMD or Press: [WIN]Typ: CMDClick: Command Prompt Step 2Typ: systeminfoPress: [ENTER] You can also view a specific line of information. Typ: systeminfo | findstr /C:”OS Name”Press: [ENTER] or (another example)Typ: systeminfo | findstr /C:”Install Date”Press: [ENTER] !! /C:”Install Date” => Case sensitive !!
-
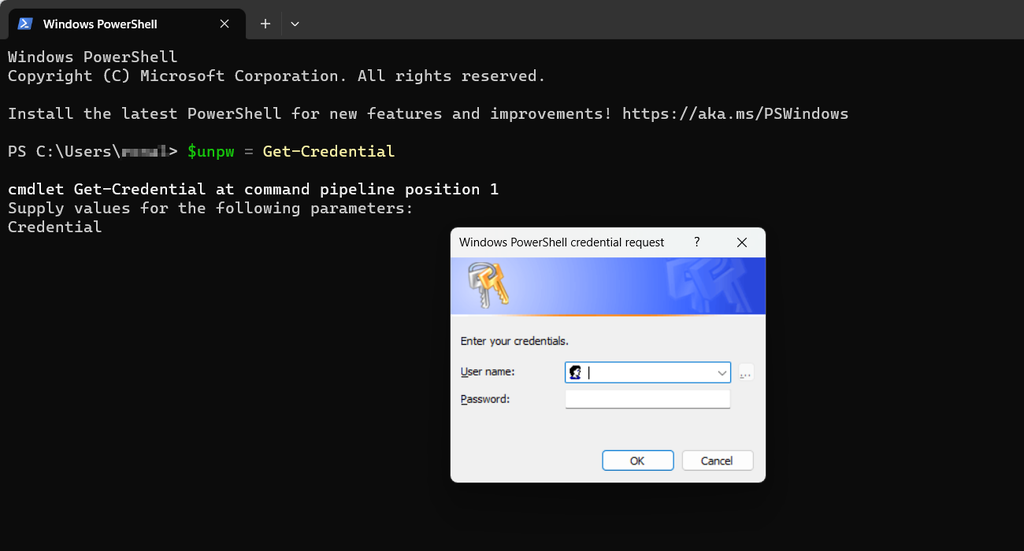
Map a networkdrive with PowerShell
Step 1Press: [WIN] + [R]Typ: PowerShell or Press: [WIN]Typ: PowerShellClick: PowerShell Step 2Typ: new-PSDrive -Name “<driveletter>” -PSProvider “FileSystem” -Root “\\<servername>\<foldername>” -PersistPress: [ENTER] If you need to connect with credentialsTyp: $unpw = Get-CredentialPress: [ENTER]orClick: OK (PowerShell 5.x) Enter the Username and PasswordTyp: New-PSDrive -Name “<driveletter>” -PSProvider “FileSystem” -Root “\\<servername>\<foldername>” -Persist -Credential $unpwPress: [ENTER] View connected drives?…
-
Make directories with mkdir and remove them with rm -r
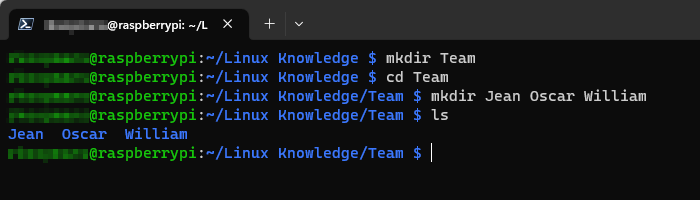
Notice that Linux is case sensitive. If you need to make a directory named Work, notice that’s a different directory as work. mkdir Workmkdir work They are two different directories.Also you can write multiple directories after one mkdir. mkdir Work work With ls (list) you can view the content of a directory. If there is…
-
God Mode in Windows 10/11
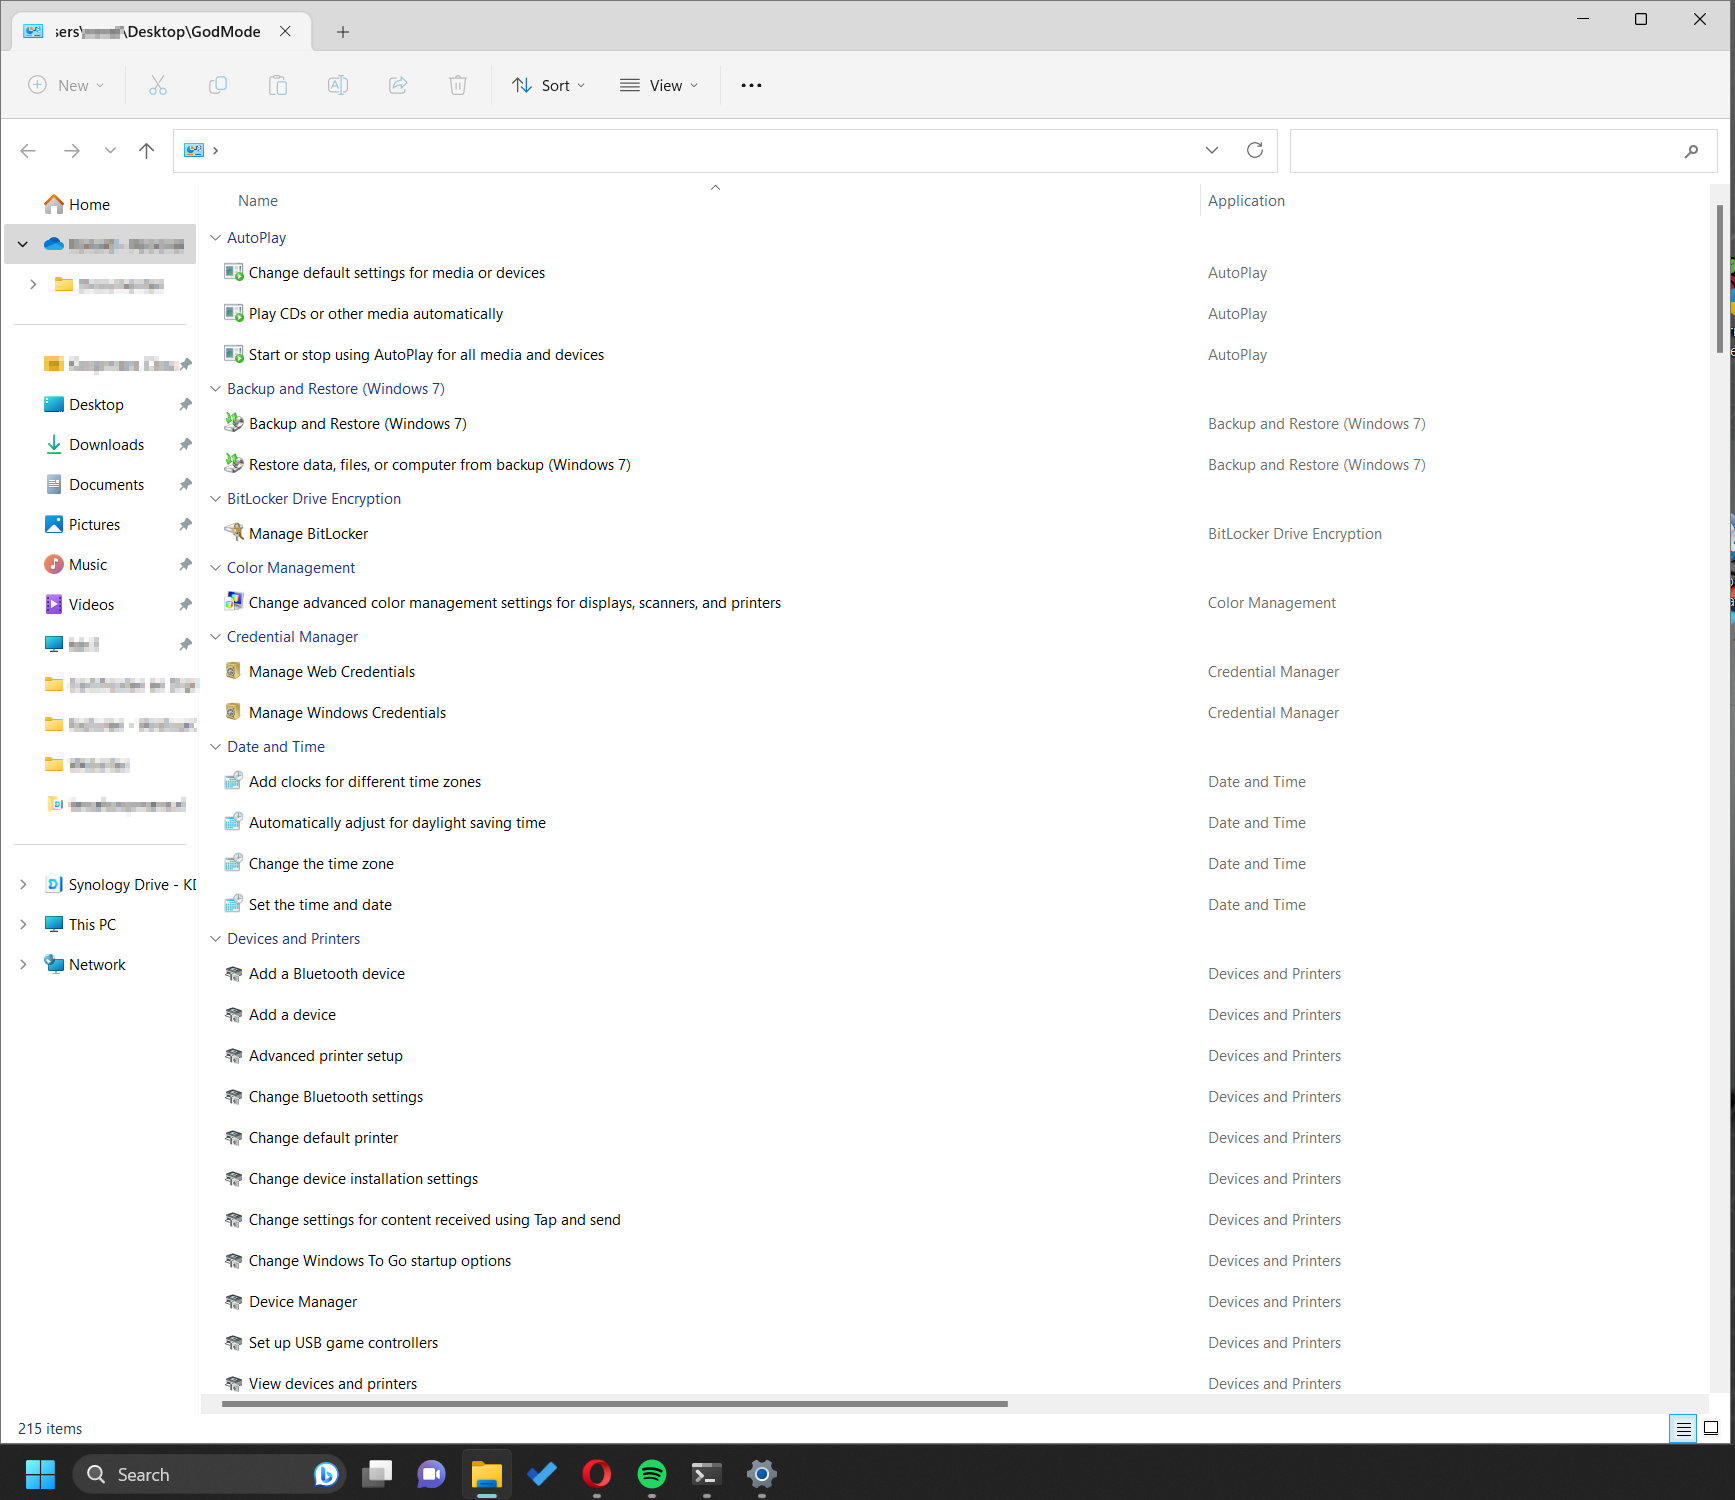
Step 1 Go to your Desktop or any other folder you like. Step 2Click Right and choose “New Folder” and name it:GodMode.{ED7BA470-8E54-465E-825C-99712043E01C}Press: [ENTER] Unfortunately it’s not possible to give the icoon a name. Now you have a folder with more than 200 windows configuration items.
-

Find your PC’s serialnumber
How to find your pc’s serialnumber? Methode 1 – Using Command Prompt Step 1Press: [WIN] + [R]Type: CMDPress [ENTER] orPress: [WIN]Type: CMDClick: Command Prompt Step 2Typ: wmic bios get serialnumberPress: [ENTER] Now you see your computers serialnumber like below: METHODE 2 – USING POWERSHELL Step 1Press: [WIN] + [R]Typ: PowerShellPress: [ENTER] orPress: [WIN]Typ: powershellClick: Powershell…